Easy way to create image like this
 | ||
Final result with Pseudo plugin (After)
|
Before we edit this picture, I need you to install this plugin first. this plugin call Fotomatic-Pseudo-IR. you can download it, just click it on that link.
and install it on your Adobe Photoshop CS4.
Step 2.
open your picture,
 |
| click to large view |
this is look like at the first time, no interesting. just like ordinary image.
Step 3.
Duplicate your image. Choose layer-duplicate layer or Ctrl + J to shortcut, and rename to IR (just making different name on the other layer).
Step 4.
select the IR layer and then go to Filter- Fotomatic-Pseudo-IR. now you can adjust the image.
Now you can see that look like IR filter with a little bit blue color. to make it more colorful, we must create some color from the other layer.
Step 5.
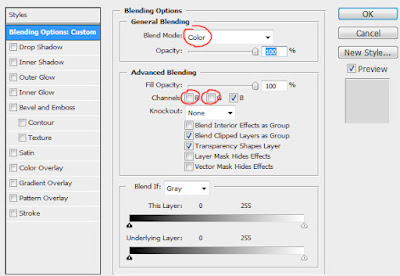
Duplicate the background layer, and bring it to top of IR layer, and change the blending mode to color mode.
right click on that layer and choose Blending Option.
uncheck Red channel and also uncheck Green channel, so the result will be like this.
as you can see, the sky look purple, and the field look yellow.
Final step.
if you want something cool, Just play with the other adjustment layer, like selective color, or hue/saturation. and The Result will be great. like this
 |
| Final result with Pseudo plugin (After) |
 |
| First image (Before) |


No comments:
Post a Comment